Why you should use Bing instead of Google!

There are a number of reasons why I like Bing over Google, but the main reason is because Bing pays me for each search I make and Google doesn’t. It’s worth just under a penny per search, but it’s not nothing consider I do a number of searches daily and also use it as a decent news source. The Bing rewards pays for all of my Skype usage, which is probably about $5/month and once in a while, I grab $5 Amazon or Target gift cards.

I find the quality of the content to be similar *most* of the time. I do searching on Google probably less than 5% of the time – mostly for doing reverse lookup of phone numbers that call me.

I would encourage you to try out Bing for yourself! Join the rewards programs and reap the benefits! Here’s my referral link. https://account.microsoft.com/rewards/rafwelcome?rh=D40EAE1A&ref=7510 (I get points if you sign up using this link.)

SD cards of different brands are slightly different sizes.

I recently downloaded an img file online where a lot of people claimed the image was too large for their SD cards. For that reason, I got a bit curious to know which card he used, which cards were larger/smaller, etc.

These were the partitions on that image.

Device Boot Start End Sectors Size Id Type
image.img1 32768 262143 229376 112M c W95 FAT32 (LBA)
image.img2 262144 14598143 14336000 6.8G 83 Linux
image.img3 14598144 250347519 235749376 112.4G 7 HPFS/NTFS/exFAT

The last sector is marked in bold. The person that shared the image claimed that the card he used was the same Samsung 128gb EVO select card. I guess he was lucky. I have 2 of those cards and this image didn’t fit on either of them.

I went through all of my SD cards to check their sizes hoping to find one that fit. Here are the sizes in order from smallest to largest.

Team 128GB Elite microSDXC UHS-I U3, V30, A1, 4K UHD Memory Card with SD Adapter, Speed Up to 90MB/s (TEAUSDX128GIV30A103)

Team 128GB Elite microSDXC UHS-I U3, V30, A1, 4K UHD Memory Card with SD Adapter, Speed Up to 90MB/s (TEAUSDX128GIV30A103)

Disk /dev/sde: 117.75 GiB, 126437294080 bytes, 246947840 sectors
Disk model: MassStorageClass
Units: sectors of 1 * 512 = 512 bytes
Sector size (logical/physical): 512 bytes / 512 bytes
I/O size (minimum/optimal): 512 bytes / 512 bytes
Disklabel type: dos
Disk identifier: 0xc9f931c9

Device Boot Start End Sectors Size Id Type
/dev/sde1 32768 262143 229376 112M c W95 FAT32 (LBA)
/dev/sde2 262144 14598143 14336000 6.8G 83 Linux
/dev/sde3 14598144 246947839 232349696 110.8G 7 HPFS/NTFS/exFAT

This was the smallest of the cards. The difference in size is only a couple of gigabytes, but if you tried to load the image on this card by the byte, you would not be successful.

SanDisk 128GB Extreme MicroSDXC UHS-I Memory Card with Adapter – C10, U3, V30, 4K, A2, Micro SD – SDSQXA1-128G-GN6MA

Disk /dev/sdd: 119.08 GiB, 127865454592 bytes, 249737216 sectors
Disk model: MassStorageClass
Units: sectors of 1 * 512 = 512 bytes
Sector size (logical/physical): 512 bytes / 512 bytes
I/O size (minimum/optimal): 512 bytes / 512 bytes
Disklabel type: dos
Disk identifier: 0xc9f931c9

Device Boot Start End Sectors Size Id Type
/dev/sdd1 32768 262143 229376 112M c W95 FAT32 (LBA)
/dev/sdd2 262144 14598143 14336000 6.8G 83 Linux
/dev/sdd3 14598144 249737215 235139072 112.1G 7 HPFS/NTFS/exFAT

This card was also one of the smaller cards.

SAMSUNG (MB-ME128GA/AM) 128GB 100MB/s (U3) MicroSDXC EVO Select Memory Card with Full-Size Adapter

Disk /dev/sdd: 119.25 GiB, 128043712512 bytes, 250085376 sectors
Disk model: MassStorageClass
Units: sectors of 1 * 512 = 512 bytes
Sector size (logical/physical): 512 bytes / 512 bytes
I/O size (minimum/optimal): 512 bytes / 512 bytes
Disklabel type: dos
Disk identifier: 0xc9f931c9

Device Boot Start End Sectors Size Id Type
/dev/sdd1 * 32768 250085375 250052608 119.2G 7 HPFS/NTFS/exFAT

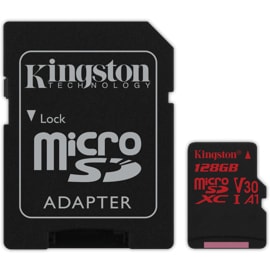
Front view of the Kingston 128GB microSDXC Canvas React Card + SD Adapter

Disk /dev/sdd: 119.48 GiB, 128286982144 bytes, 250560512 sectors
Disk model: MassStorageClass
Units: sectors of 1 * 512 = 512 bytes
Sector size (logical/physical): 512 bytes / 512 bytes
I/O size (minimum/optimal): 512 bytes / 512 bytes
Disklabel type: dos
Disk identifier: 0xc9f931c9

Device Boot Start End Sectors Size Id Type
/dev/sdd1 32768 262143 229376 112M c W95 FAT32 (LBA)
/dev/sdd2 262144 14598143 14336000 6.8G 83 Linux
/dev/sdd3 14598144 250347519 235749376 112.4G 7 HPFS/NTFS/exFAT
/dev/sdd4 250347520 250560511 212992 104M 83 Linux

The difference in sizes are trivial, but as you can see, the image would only fit on 1 of the cards. I’ll show you in a later post how I got the image to fit on any card.

Things to look out for when buying gift cards from Raise.com

I love Raise. I used to buy gift cards from Raise.com all the time. It used to give me the opportunity to earn an additional 5% in airline mileage. It’s not so much anymore, but it’s not nothing and was always worth it for me, until now.

Actually, I would say go ahead and keep doing it, but be careful.

I wanted a laptop from Walmart, so I went to Raise and bought some Walmart gift cards to acquire the laptop. It worked great and I was expecting something like 4-5 points per dollar (3 points for the Walmart shopping portal and 1-2 points for Raise.

This would’ve been great, but the nightmare began after I returned the laptop. Walmart refunded my credit card and one of the gift cards, but not both. I went on chat with Walmart.com multiple times and the answers varied between they would investigate, they would credit it, and they would need to escalate. Every time, they had me waiting 24 hours in the meanwhile. Finally, I called and they told me the gift card was used for several returns and was blacklisted or something like that. They said I needed to provide a picture of the original gift card along with the receipt of purchase of the card to get the credit. Fine.

I sent them the Raise receipt along with a screenshot of the digital gift card. Did they accept it? Of course not. Response:

Hi Alton,

We have researched your Gift Card concern and determined that this Walmart Gift Card was bought from a third party. Please contact the third party seller for assistance on the gift card.

Thank you for contacting Walmart, where we are always happy to help!

– Walmart Gift Card

Are they really happy to help? I doubt it. The woman on the phone didn’t sound happy. They wouldn’t pass me over to anyone else. The only thing they could offer me say they’re sending the message in and wait for 24 hours.

What did I do then? Well, the only logical thing to do is go to Raise. I went to Raise and gave them the story. They told me that if I was able to redeem the card the first time, that’s all that they were responsible for. I think that’s the right thing, actually. If the card worked, it’s Walmart’s fault that they’re not returning my credit. I then asked if they could help me with the receipt. Of course not. Raise could not provide it.

So here I am, stuck. What would you do?

As much as I hope to get some good advice here, perhaps I can offer some advice so that you don’t run into the same problem.

  1. When buying gift cards, unless you’re sure you’re not returning the item, avoid any gift card that doesn’t end in .00 or standard number. For example, buy a card that’s $10, not $10.34. Don’t buy an $18 gift card, buy a $20 gift card.
  2. Use your gift cards asap. Don’t even buy the gift card unless you’re getting a really good discount or you are planning to use it immediately. There are hackers out there, script kiddies actually, that will run numbers randomly to try to hit the right combinations. I’ve fallen victim to it a couple of times. I hope that you do not.

Good luck! Please comment down below!

Install & Configure OpenLDAP in Linux

I’m doing this only because I’ve done this multiple times and never documented it and had to go through and do multiple google searches each time. Hopefully this is the last time.

First off, install the OpenLDAP server and clients. I’ll install the client on the server too so that I could easily troubleshoot. If you’re using IPtables, you’ll need to open up ports 389 and 636 as well.

yum -y install openldap-clients openldap-servers

Next, I want to do some logging so that I could get messages if I need to troubleshoot. Here’s how to enable the syslog side of logging. Configuring the details of logging from the LDAP server side comes from the cn=config information.

mkdir /var/log/openldap
echo "local4.* /var/log/openldap/openldap.log" >> /etc/rsyslog.conf
systemctl restart rsyslog

Configuring TLS for openldap. This just edits the /etc/sysconfig/slapd file and adds ldaps to it so that it will listen on that port.

sed -i "s,ldap:///,ldap:/// ldaps:///," /etc/sysconfig/slapd

Restart the LDAP server for ldaps to take effect.

systemctl start slapd
systemctl enable slapd

Extending schema of openldap so that it accepts a bunch of the common attributes that typical directory servers have. The adschema attached is to support the MemberOf attribute, commonly used by AD servers. You can put the file anywhere you want. I happened to do this in Vagrant, so my file was in /vagrant.

ldapadd -Y EXTERNAL -H ldapi:/// -f /etc/openldap/schema/cosine.ldif
ldapadd -Y EXTERNAL -H ldapi:/// -f /etc/openldap/schema/nis.ldif
ldapadd -Y EXTERNAL -H ldapi:/// -f /etc/openldap/schema/inetorgperson.ldif
ldapadd -Y EXTERNAL -H ldapi:/// -f /vagrant/adschema.ldif

I’m also extending the schema using some of the schema files provided by OpenLDAP itself.

Now it’s time to configuring rootdn. This is basically the top of the LDAP tree. You should download the file and edit it. Change your directory manager password and the rootdn to whatever you like. You can use dc=xxx or o=xxx.

ldapmodify -Y EXTERNAL -H ldapi:/// -f /vagrant/config.ldif

Now we can add the users. Here’s a sample ldif for the users. Obviously, you’ll need to change the directory to match your rootdn.

ldapadd -x -D cn=ldapadm,dc=poc,dc=segmentationpov,dc=com -w password -f /vagrant/directory.ldif

Congratulations! Your LDAP server is now running. You can test by running this:

ldapsearch -x -D cn=ldapadm,dc=poc,dc=segmentationpov,dc=com -b 'dc=poc,dc=segmentationpov,dc=com' objectclass=* -w password

It should return your entire directory that you uploaded in directory.ldif.

I enabled SSL earlier, but if you try an ldapsearch with SSL, you’ll get this:

[root@centos7 certs]# ldapsearch -H ldaps://192.168.0.117:636 -x -D cn=ldapadm,dc=poc,dc=segmentationpov,dc=com -w password -b 'dc=poc,dc=segmentationpov,dc=com' objectclass=* -ZZ
ldap_start_tls: Can't contact LDAP server (-1)
additional info: TLS: hostname does not match CN in peer certificate

If you want to ignore this and move forward, the setting is on the client side. You can change it in /etc/openldap/ldap.conf. Just put in there:

TLS_REQCERT never

If you get a message like this:

[root@centos7 certs]# ldapsearch -H ldaps://192.168.0.117:636 -x -D cn=ldapadm,dc=poc,dc=segmentationpov,dc=com -w password -b 'dc=poc,dc=segmentationpov,dc=com' objectclass=* -ZZ
ldap_start_tls: Operations error (1)
additional info: TLS already started

The issue is that you’re trying to run StartTLS in 2 places. You can omit the -ZZ and run like this:

ldapsearch -H ldaps://192.168.0.117:636 -x -D cn=ldapadm,dc=poc,dc=segmentationpov,dc=com -w password -b 'dc=poc,dc=segmentationpov,dc=com' objectclass=*

or run with the -ZZ like this:

ldapsearch -H ldap://192.168.0.117:389 -x -D cn=ldapadm,dc=poc,dc=segmentationpov,dc=com -w password -b 'dc=poc,dc=segmentationpov,dc=com' objectclass=* -ZZ

That’s just using the default certificate that comes with OpenLDAP. If you want to use your own certificate, you can put them in

ldapmodify -Y EXTERNAL -H ldapi:/// -f tls7.ldif
SASL/EXTERNAL authentication started
SASL username: gidNumber=0+uidNumber=0,cn=peercred,cn=external,cn=auth
SASL SSF: 0
modifying entry "cn=config"
SV-LT-1361:Downloads altonyu$ openssl s_client -connect 192.168.0.117:636
CONNECTED(00000003)
depth=0 C = US, ST = CA, L = San Francisco, O = ShocKNetworK, CN = ldap.poc.segmentationpov.com, emailAddress = [email protected]
verify error:num=20:unable to get local issuer certificate
verify return:1
depth=0 C = US, ST = CA, L = San Francisco, O = ShocKNetworK, CN = ldap.poc.segmentationpov.com, emailAddress = [email protected]
verify error:num=21:unable to verify the first certificate
verify return:1
Certificate chain
0 s:/C=US/ST=CA/L=San Francisco/O=ShocKNetworK/CN=ldap.poc.segmentationpov.com/[email protected]
i:/C=US/ST=California/O=ShocKNetworK/OU=Security/CN=zangief.shocknetwork.com/[email protected]
Server certificate
-----BEGIN CERTIFICATE-----
MIIEqzCCA5MCCQCsXDM+kPyf+DANBgkqhkiG9w0BAQsFADCBljELMAkGA1UEBhMC

Chinese handwriting keyboard on amazon fire tablet

It took me a little effort to find this, so I figured that I would do a blog post on it. It’s pretty easy to do. Just follow the instructions on installing Google Play Store. You can find plenty of them. Here are a couple:

https://www.howtogeek.com/232726/how-to-install-the-google-play-store-on-your-amazon-fire-tablet/

https://www.androidpolice.com/2020/07/11/install-play-store-amazon-fire-tablet/

Once you’ve installed the Google Play store, you could go into it and install the Gboard. Hope this works for you! If you have any issues, please comment below.

Use yum to manage your packages and stop using rpm!

I hate seeing the RPMDB altered message when doing yum updates!

Transaction Summary
=======================================================================================================================
Install 1 Package
Upgrade 1 Package

Total size: 309 M
Is this ok [y/d/N]: y
Downloading packages:
Running transaction check
Running transaction test
Transaction test succeeded
Running transaction
Warning: RPMDB altered outside of yum.

For that reason, I tell sysadmins when installing or upgrading rpms to use:

yum -y install <rpm file>

and to use

yum -y remove <rpm name>

to remove the rpm you want.

Solaris pkg upgrade fails with “maximum number of instances of the package which may be supported at one time on the same system has already been met” message

This message is pretty awesome, isn’t it? You can get this message when trying to upgrade a package. At least that’s what happened to me.

username# pkgadd -d .

The following packages are available:

  1  pkgname          pkgname

                          (sparc) version.sol5.sparc

Select package(s) you wish to process (or 'all' to process all packages). (default: all) [?,??,q]: 1

Processing package instance <pkgname> from </tmp/ven/solaris>

pkgname(sparc) version.sol5.sparc Illumio

Current administration requires that a unique instance of the <pkgname> package be created.  However, the maximum number of instances of the package which may be supported at one time on the same system has already been met.

 No changes were made to the system.

This issue is pretty easy to get around. You just need point your admin file that has the right options. In my case, my admin file needed the instance=overwrite:

mail=
instance=overwrite
partial=ask
runlevel=ask
Require that our dependencies are met when installing.
idepend=quit
However, if someone tries to uninstall us but another package depends on us,
we should just warn them & ask if they want to proceed anyway.
rdepend=ask
space=ask
setuid=ask
conflict=ask
action=nocheck
networktimeout=60
networkretries=3
authentication=quit
keystore=/var/sadm/security
proxy=
basedir=default

If you’re using instance=ask, it works also. It’ll just ask you before overwriting.

Fooling around with pkgadd (Solaris packages)

I basically had a Solaris SVR4 package that I needed to install. I didn’t care if the package worked or not after it installed. This is what happened when it first failed.

pkgadd: ERROR: checkinstall script did not complete successfully

The installer said that I was missing a package, so I went into the pkgname/install/checkinstall script and just commented those lines out. After doing that, this happened.

root@alton-solaris:/tmp# pkgadd -d .
The following packages are available:
1 pkgname pkgname
(i386) version
Select package(s) you wish to process (or 'all' to process
all packages). (default: all) [?,??,q]:
Processing package instance from
pkgname(i386) version
company
Executing checkinstall script.
OS Release = 11.4
Processing package information.
Processing system information.
pkgadd: ERROR: packaging file is corrupt
file cksum <26912> expected <26914> actual
Installation of failed (internal error).
No changes were made to the system.

Obviously, there’s some sort of check for integrity of the file. To get around that, I went in and edited the pkgname/pkgmap file to make the changes from 26912 to 26914.

After doing this, the package magically installed. Fun!

Changing root password on Solaris 11.3 x86

I’m posting this only because the process has changed a bit since I did it back in the days. Because I’m not using Solaris on SPARC, there’s no STOP-A, boot -s, etc.

Just like back in the days with Solaris 8, you would need to boot with a cdrom or PXE or jumpstart, whatever method you have. Afterwards, you take the shell option. Obviously, you’re not installing the OS.

Solaris 11 uses ZFS, not UFS so you can’t directly mount a partition. You need import a pool instead.

mkdir /b
zpool import -f -R /a rpool
zfs set mountpoint=legacy rpool/ROOT/solaris
mount -F zfs rpool/ROOT/solaris /b
vi /b/etc/shadow

Edit the shadow file

Find your username and remove the password hash

Change your user id
username:whateverthehashis:12345::::::23456
to
username::12345::::::23456

Then we will need to allow empty passwords at login

$ vi /b/etc/default/login
Change the line:
PASSREQ=YES
to
PASSREQ=NO

umount /b
zfs set mountpoint=/ rpool/ROOT/solaris
zpool export rpool
init 6

When the system boots, you should be able to log in as root and just press return for the password. If you’re logging in through SSH, you won’t need to enter a password.

Hope this saved you some time!

Install .NET 2.0 in Windows 10

What!? Why would you want to do that!? A friend of mine recently brought a computer to me for him to install some old software on. This happened to be some custom software that was written and required .NET 2.0. I tried installing the software and it wouldn’t install because it .NET 2.0 was required and if you go to Microsoft’s website, it looks like the only version you could get is .NET 4.8 and it already came with the OS that his laptop came with! What gives!?

I managed to find this command only that allowed me to continue the install:

DISM /Online /NoRestart /Enable-Feature:NetFx3

Turns out there are tons of YouTube videos and other posts about how to install it. I just didn’t think to look. You could actually just go to the control panel and install it from there as well.

image

Anyway, hope this post can save you some time!